Posts

The Perfect Shot Semester 2 Week 12

Image
 This week our team had two main goals: 1) Complete our Poster for the Design Fair 2) Continue to test and confer our equations are correct. We decided to divide and conquer this week, two of our teammates went to local parks to recruit and test children's max height distance thrown. This data was analyzed through video recordings and iPhone stopwatch in order to get an approximate velocity. Once this was completed the other teammate analyzed our projected velocity with the velocity obtained through the physics equations to confirm they are accurate. If the results were not accurate they were adjusted with the more accurate velocity results from the equation. Additionally, Lule met with our faculty advisor to work out and ensure our equations were correct prior to implementation and poster showcase. The results gathered can be seen at the link below: https://docs.google.com/spreadsheets/d/1j17b16lWyhwcAYtE1rjz1ky_r6INy_AcjhhSeXNoiFk/edit#gid=0 The poster for the design showcase can...


The Perfect Shot Semester 2 Week 11

Image
 This week we continued to gather max throwing height data. An additional 7 children's data was gathered from a local park on the 26th of March.  The data can be seen in the link below: https://docs.google.com/spreadsheets/d/1j17b16lWyhwcAYtE1rjz1ky_r6INy_AcjhhSeXNoiFk/edit#gid=0

The Perfect Shot Semester 2 Week 10

 This week our team conducted our broader impacts discussion with our class where we spoke about how our product would impact our local and global communities socially, economically, environmentally, and the safety impact of our product.  Some of the impacts we had are:  Social Impact: ·         Our product will allow more kids to play, including the less sports inclined kids to participate and still have fun with the improved shooting accuracy coupled with the scaled sizes of hoop, ball, and court. Impacting both local and global communities by adding this quick attachment system to their local parks allowing more children to play the sport by having an adult adjust the hoop for them. ·         The product will allow children to have a boost of confidence with increased accuracy based of data collected from live research, EGR 365 has laid foundational ground work on how to conduct and work with in ...

The Perfect Shot Semester 2 Week 9

Image
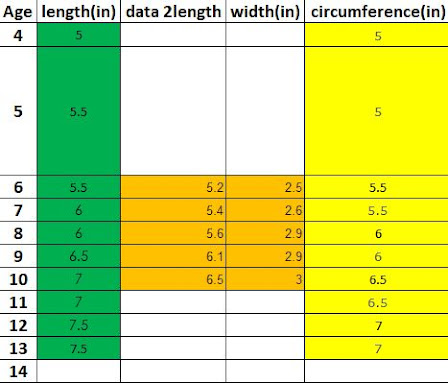
 This week our team focused on gathering data and researching different approaches that our Basketball data could be applied to Volleyball. Research on anthropremetric data by age for arm length was conducted. This data was added to our excel page that outlined the average height to age, we added the length of the arm to the average height of the child to approximate the height of a child with their hands fully extended above their head. This data will help us analyze the height at which a net should be set and will lead us into the data needed to scale the court size to the Childs age.  References: https://www.craftyarncouncil.com/standards/child-youth-sizes https://www.ncbi.nlm.nih.gov/pmc/articles/PMC7543216/ Google Doc Excel Link: https://docs.google.com/spreadsheets/d/1notCyaXEyVGY-bQoTFuIDwcLd19aB3cH/edit#gid=275308221

The Perfect Shot Semester 2 Week 8

Image
   This week our team focused on preparing for our midterm presentation. This presentation encompassed a brief overview of what our team accomplished during the last semester and what we have worked towards since the beginning of this semester. With that in mind, we mainly focused on our finished products and the data that has been gathered. The finished product resulted in several rims, each consisting of different radii ranging from regulation size upwards to 26 in., and small square tubing welded onto each of those rims. Those small tubing pieces would be able to slide into a large square tubing on a bracket that is able to be attached to a standard backboard. Aside from that, our team demonstrated the process we took in order to develop the pieces described above. We talked about the struggles and solutions we had to determine throughout our development. Additionally, we explained the results of our data and how the testing took place. We proceeded to answer some of the qu...

The Perfect Shot Semester 2 Week 7

Image
  This week our team focused on a few things such as gathering data by testing our prototype, correcting past Deliverables (5 & 6), and prepping for our midterm presentation on 22 FEB 2023. Our protocol for testing has shifted slightly, we are attempting to gather data by having children shot 10x shots on the rim we believe they should be using and shooting on the rim a rim size above/ below to compare the data to confirm our calculations are correct. A lot of time was focused on prepping for our presentation on the 22 FEB. During this presentation we will be detailing where we started, where we are at, and where we are going with the rest of our time in our CAPSTONE project.  The table above outlines the data that we collected in the previous week. Five additional children were added. Conditions were unfavorable with a 12 mph crosswind, this weather impacted the shot projectile slightly and may have impacted the shot accuracy adversely. That being said with a product bein...

The Perfect Shot Semester 2 Week 6

Image
 This week our team put a focus on completing our build 100% and worked one Deliverable 6. To finish our build we grinded off excess material to ensure a smooth fit, smoothed out metal burs on all brackets and tubing. While we were grinding off excess material, we grinded past the metal and created a hole. This hole was to deep to be patched up so we remade the square tubing bracket, and finished grinding the build. We aligned every square tube and used a standing drill press to go through the metal in the same spot. This allows us to use one trailer hitch  bracket on the backboard and just pull the bolt that goes through 2x places on the square tubing. This quick change system allows our team to make rapid rim changes that can be adapted to different age groups during testing. When our system is put into full operational mode it will allow the referee or coach of a team change the rim based on the age group who is playing quickly. Additionally, this system is forecasted to pr...

The Perfect Shot Semester 2 Week 5

Image
 This week our team was able to test our design at a local park during a run club time. Additionally, we continued in the manufacturing process, we took the Aluminum rims we built and prepped them for welding to the square bracket. Welding Aluminum posed to be a difficult process, however Wes and one of the workers were able to complete welding our material. We designed, prepped, and manufactured three more rim builds at 18 ", 20", and 24 " in quick attach forms. We still need to work some more to complete our build a 100%. We will focus on drilling holes in the same location, so we can leave one bracket on and just switch the rim build out. We will also need to grind excess material off and smooth the metal burs out. Our team has also been putting thought into how we can use our data and apply it to Volleyball.

The Perfect Shot Semester 2 Week 4

Image
 This week was focused on learning different equipment necessary for our teams manufacturing process. The equipment learned and utilized are Metal Lathe, Standing Drill Press, Cold Cut Saw, and Threading Tapes. Once the equipment was proficiently learned we focused on machining die at a 1/2 " diameter to bend our circular tubing in the desired sizes for the rim portion of our design. We cut the material at 75" and 89" to have some extra material, this is due to the last few inches of the material not being able to be bent. The excess material will be cut and welded. Tomorrow on the 31st of January the team will aim to test 15 individuals on our build. The pictures above show different stages of the manufacturing process for both machining the necessary die for our pipe bending tool and cutting the material to be bent.

The Perfect Shot Semester 2 Week 3

Image
 This week was a busy week for our team, we focused a major portion of our team manufacturing our new design. We were able to successfully pick up our material from IMS. Once the material was picked up our team traveled to Bailey's friends house and began building. This process consisted of measuring and marking the metal for cuts, using a grinder with a cutting wheel to cut the back board plates, used a chop saw to cut the square tubing, cleaning the metal for welding, creating shims to make the square tubing fit properly with little slop, and welding the pieces together. There was no pipe bending machine on hand so in the following days we traveled to CBU business park, at this meeting with Wes we found out the squared tubing we purchased for the rim would not be able to be bent due to a missing die for the machine. It worked out that Wes had to go to IMS and would purchase round tubing to trade us. The pictures above are from Bailey's friends house were we spent a significan...

The Perfect Shot Semester 2 Week 2

Image
Our team voted last week on the trailer hitch design as our new build moving forward. This design consist of separate rims, a standard size rim (18 ") used by ages 11+ , a medium rim (22 ") used by ages 8-10, and a large rim (24 ") used by ages 4-7. This design can be easily interchanged by sliding the new rim over the protruding post from the backboard and secured by a pin.

The Perfect Shoot Semester 2 Week 1

Image
 Over the winter break our team met at one of Bailey's family friends shop. At the shop we were taught how to properly operate and setup a Lincoln MiG welder. During this time we were taught what setting to use to avoid burning through the metal , how to scourge a piece a metal without cutting through it to bend the material at a 90 degree angle in order to add the bolt. The bolt was used to adjust the size of the rim. We spent some time trying to true the metal into a more circular shape, with no luck. Unfortunately we realized that our current design does not work in the way we thought it would, where the rim could be adjusted for the targeted age groups. With a 12 in bolt when it was fully tightened there was a minimal impact on the overall circumference of the rim. We expected the rim to be adjusted the same or close to the length of the bolt that was welded into place. We considered possible cutting the material, re molding into a circular shape, and repeating the building pro...

The Perfect Shot Week 12

Image
Full Scale mockup with adjustable rim Scaled Version that fits our 3-D printer capabilities The team finished the scaled and full scaled versions of our design. The scaled version will be printed and tested for possible points of failure for our design. The full scaled model will be created over the winter break. To create the full scale model a basketball rim will be cut, a agricultural metal retaining wall is going to be bent and welded onto the circle, a 3 inch square portion of metal will have 2 holes made into the center, a bolt will be welded to one of the open ends, these square portions will be welded to the outside surface of the rim and a 10 in bolt will be threaded through the holes, once completed the circle will be cut out, flat bar steel will be used to support the additional size and weight of the rim.  Additionally, this week the team has focused on creating and editing the presentation slides for the final presentation of the semester. The presentation will state w...

The Perfect Shot Week 11

Image
This week the team was finally able to get materials from Home Depot that will be utilized to construct the adjustable rim. The Basketball hoop order is in the process of being obtained, however due to an extended break for Thanksgiving it is likely that the order will be slightly delayed for pickup.  Formulas were made to calculate the optimal height of the hoop, the size of the key in relation to height, and the throwing velocity of each member: The image above demonstrates the calculations for an adult's expected results when shooting from a Free Throw and Three Point Distance. To calculate an accurate result, the best known angles for each respective shot, distance from each line to the rim, and an average height of six feet were all used. As seen above, there are two formulas that were used to calculate the time and initial velocity under those ideal conditions. With the data that was gathered with the formulas, a more accurate representation of scaling for our subjects could ...

The Perfect Shot Week 10

Image
 During our last client meeting, we were instructed to keep moving forward with our most recent approach. Using the data provided by our subjects throwing a ball, such as angles, velocities, and distances, we were able to calculate a ratio for scaling the basketball game to fit a child's needs. However, the gathered data was mainly that of children. To make the data more accurate, we decided to gather in-person data from an adult and use that to create our ratio for scaling. By doing so, the entirety of the scaling would have been based off our gathered data, and not both researched and gathered data. The data shown in the image portrays the velocities, times, and angles of two different adult subjects. Using this, our team was able to create a scaling ratio that we could compare to our previously calculated ratio, which was based on both research and gathered data.  Moving forward, our team intends to use the scaled data to create prototypes for our rim concept and display th...

The Perfect Shot Week 9

Image
  This week the team went out to local neighborhoods and schools to ask parents/ children to participate in our study. A total of 10 children were recorded and added to our excel spread sheet. Additionally, a more accurate Velocity profile was created for each of the children. The data above from rows 15 to 24 were added, a wide variety of ages were gathered to add to each age group. The data depicted above is a continuation of the data gathered from the previous photo. It depicts the 3rd throw and the new velocity profile based of the mean data of each throw. The picture above shows the equation used for the new velocity profile.

The Perfect Shot Week 8

Image
 This week the team went out to local neighborhoods and schools to ask parents/ children to participate in our study. A total of 9 children were recorded and added to our excel spread sheet.

The Perfect Shot Week 7

Image
This week was focused on filling the gaps in our research and data and adding to the data sets to further our team towards a functional scalable basketball hoop to various age groups. The data above comes from multiple sources and compiled into one chart. The data was derived from sizing charts used in mitten and glove making. Data collected during our testing will be added to this list. The above is a graphical representation of the hand length and hand width to age The above takes the average adult hand length and circumference calculates the percent difference between the the hand and ball The data depicts the collection of hand data per age  and the recommended ball size for that age  and calculate the percent difference. The data  shows the ratio of ball size to standard rim, the projected adjustable rim sizes are also shown so a comparrison of ball to rim ratio could be made. It is our hopes that a smaller ball coupled with bigger rim will promote proper form in the...

The Perfect Shot Week 6

Image
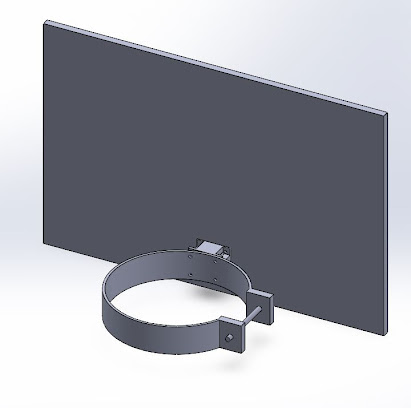
 A large portion of time this week for the team was directed and aimed to our mid semester presentation. The presentation covers what has been done and a prediction of where we are going with the project. Our team has made it through many hurdles throughout the design process, and made a decision to move forward with concept 2. Concept 2 blends a pre existing basketball hoop with customizable/ adjustable attachments, this changes will allow the hoop to be adapted to a variety of age groups and will better suite their needs. These adjustable parts were created via Solidworks and are depicted below: The bracket pictured above, is designed to mount to the back of the rim mount. Longer length bolts may be required to correctly fasten to backboard The backboard extensions will slide into the backboard providing a bigger target for the children to hit. The extension with a bigger rim is aimed to improve the accuracy of smaller children while promoting proper form. Pictured above is two c...

The Perfect Shot Week 5

Data was collected from one of the members of the The Perfect Shots kids. Additionally anthropometric data such as hand length, width, and overall height was recorded. There were three children available ages 4,9, and 11 years old. Each child held a standard Basketball of 22 in. circumference and performed a jump shot. They each had 3 throws where distance was recording and the shot were filmed. The time from when the ball left the hand and first impacted the ground was recorded. velocity was calculated by V=d/t. The mean data of each child is as follows: Kai Age 4: Mean distance: 98.67 [in.] Mean Time: 1.13 [s] Mean Velocity: 96.80 [in./s] Taylor Age 9: Mean distance: 199.67 [in.] Mean Time: 1.42 [s] Mean Velocity: 140.28 [in./s] Rae Age 11: Mean distance: 212.67 [in.] Mean Time: 1.58 [s] Mean Velocity: 134.60 [in./s]