Posts

The Perfect Shot Semester 2 Week 4

Image
 This week was focused on learning different equipment necessary for our teams manufacturing process. The equipment learned and utilized are Metal Lathe, Standing Drill Press, Cold Cut Saw, and Threading Tapes. Once the equipment was proficiently learned we focused on machining die at a 1/2 " diameter to bend our circular tubing in the desired sizes for the rim portion of our design. We cut the material at 75" and 89" to have some extra material, this is due to the last few inches of the material not being able to be bent. The excess material will be cut and welded. Tomorrow on the 31st of January the team will aim to test 15 individuals on our build. The pictures above show different stages of the manufacturing process for both machining the necessary die for our pipe bending tool and cutting the material to be bent.

The Perfect Shot Semester 2 Week 3

Image
 This week was a busy week for our team, we focused a major portion of our team manufacturing our new design. We were able to successfully pick up our material from IMS. Once the material was picked up our team traveled to Bailey's friends house and began building. This process consisted of measuring and marking the metal for cuts, using a grinder with a cutting wheel to cut the back board plates, used a chop saw to cut the square tubing, cleaning the metal for welding, creating shims to make the square tubing fit properly with little slop, and welding the pieces together. There was no pipe bending machine on hand so in the following days we traveled to CBU business park, at this meeting with Wes we found out the squared tubing we purchased for the rim would not be able to be bent due to a missing die for the machine. It worked out that Wes had to go to IMS and would purchase round tubing to trade us. The pictures above are from Bailey's friends house were we spent a significan...

The Perfect Shot Semester 2 Week 2

Image
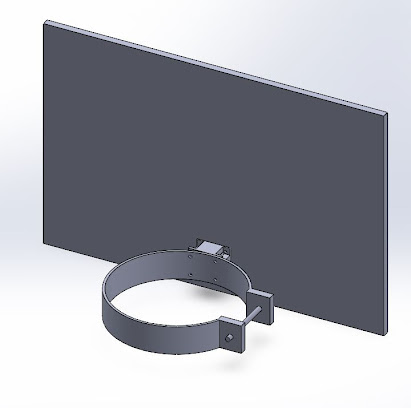
Our team voted last week on the trailer hitch design as our new build moving forward. This design consist of separate rims, a standard size rim (18 ") used by ages 11+ , a medium rim (22 ") used by ages 8-10, and a large rim (24 ") used by ages 4-7. This design can be easily interchanged by sliding the new rim over the protruding post from the backboard and secured by a pin.

The Perfect Shoot Semester 2 Week 1

Image
 Over the winter break our team met at one of Bailey's family friends shop. At the shop we were taught how to properly operate and setup a Lincoln MiG welder. During this time we were taught what setting to use to avoid burning through the metal , how to scourge a piece a metal without cutting through it to bend the material at a 90 degree angle in order to add the bolt. The bolt was used to adjust the size of the rim. We spent some time trying to true the metal into a more circular shape, with no luck. Unfortunately we realized that our current design does not work in the way we thought it would, where the rim could be adjusted for the targeted age groups. With a 12 in bolt when it was fully tightened there was a minimal impact on the overall circumference of the rim. We expected the rim to be adjusted the same or close to the length of the bolt that was welded into place. We considered possible cutting the material, re molding into a circular shape, and repeating the building pro...

The Perfect Shot Week 12

Image
Full Scale mockup with adjustable rim Scaled Version that fits our 3-D printer capabilities The team finished the scaled and full scaled versions of our design. The scaled version will be printed and tested for possible points of failure for our design. The full scaled model will be created over the winter break. To create the full scale model a basketball rim will be cut, a agricultural metal retaining wall is going to be bent and welded onto the circle, a 3 inch square portion of metal will have 2 holes made into the center, a bolt will be welded to one of the open ends, these square portions will be welded to the outside surface of the rim and a 10 in bolt will be threaded through the holes, once completed the circle will be cut out, flat bar steel will be used to support the additional size and weight of the rim.  Additionally, this week the team has focused on creating and editing the presentation slides for the final presentation of the semester. The presentation will state w...

The Perfect Shot Week 11

Image
This week the team was finally able to get materials from Home Depot that will be utilized to construct the adjustable rim. The Basketball hoop order is in the process of being obtained, however due to an extended break for Thanksgiving it is likely that the order will be slightly delayed for pickup.  Formulas were made to calculate the optimal height of the hoop, the size of the key in relation to height, and the throwing velocity of each member: The image above demonstrates the calculations for an adult's expected results when shooting from a Free Throw and Three Point Distance. To calculate an accurate result, the best known angles for each respective shot, distance from each line to the rim, and an average height of six feet were all used. As seen above, there are two formulas that were used to calculate the time and initial velocity under those ideal conditions. With the data that was gathered with the formulas, a more accurate representation of scaling for our subjects could ...

The Perfect Shot Week 10

Image
 During our last client meeting, we were instructed to keep moving forward with our most recent approach. Using the data provided by our subjects throwing a ball, such as angles, velocities, and distances, we were able to calculate a ratio for scaling the basketball game to fit a child's needs. However, the gathered data was mainly that of children. To make the data more accurate, we decided to gather in-person data from an adult and use that to create our ratio for scaling. By doing so, the entirety of the scaling would have been based off our gathered data, and not both researched and gathered data. The data shown in the image portrays the velocities, times, and angles of two different adult subjects. Using this, our team was able to create a scaling ratio that we could compare to our previously calculated ratio, which was based on both research and gathered data.  Moving forward, our team intends to use the scaled data to create prototypes for our rim concept and display th...